-
The Azure Vault, PGP, and other matters Part 2
Ok, where were we (Back to Part 1) … Ah, we are down to the PGP content in the Azure Vault getting ready to use it….
At this point I gather you have created your vault and placed the middle contents of the PGP Key file into the secrets value…. Drilling into my Secret:
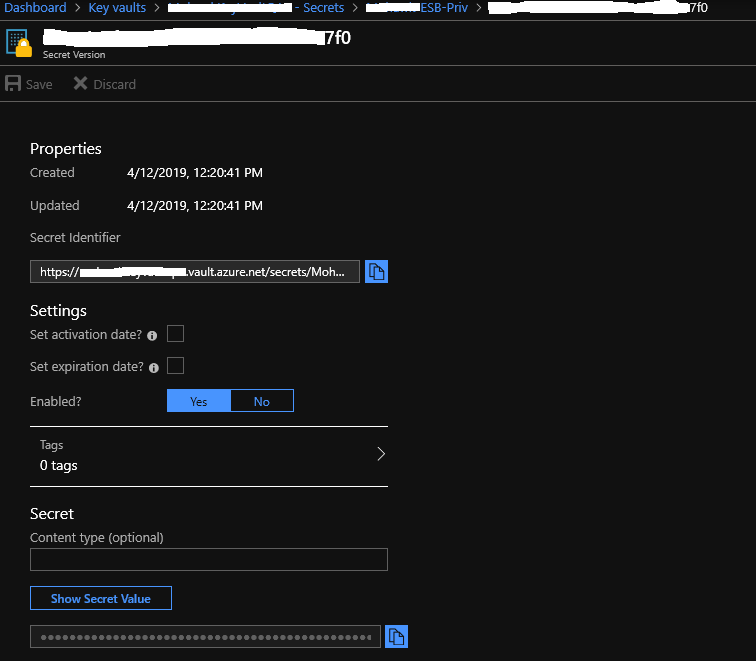
We are going to use parts of this detail to pass along to the Get Keys Azure function – as a reminder we are here:
My Azure function takes three values:
SecretName, SecretVersion, and VaultPath. These values come from the URL that you find on the Secret Detail shown above.
https://<VaultPath>.vault.azure.net/secrets/<SecretName>/<SecretVersion>
From the Overview of your Vault, under Settings you will find the Secrets link to get down into the detail window. You will need to click through some windows before you get to the Secret Identifier (the url to the secret). Keep in mind if you added addition key values you get a new Version id each time.
So why do the GetKeys Azure Function this way? Easy, it’s generic. One can place as many PGP keys as needed in either the same vault or same secret and use just different versions of the secret – Or – create a new secret within the same vault – Or create different vaults (Keep in mind on that last choice, one must grant access to new vaults for this or other Azure Functions to be able to access it). What level of “Generic” is up to you, just know the access path.
Let’s get to the interesting part, an Azure Function.
public static class GetKeys
    {
        [FunctionName("GetKeys")]
        public static async Task<IActionResult> Run(
            [HttpTrigger(AuthorizationLevel.Function, "get", "post", Route = null)] HttpRequest req,
            ILogger log)
        {
            log.LogInformation("C# HTTP trigger function processed a request.");

            string nameVault = req.Query["VaultPath"];
            string nameSecret = req.Query["SecretName"];
            string versionSecret = req.Query["SecretVersion"];
We start the Azure Function (using VS 2019) by naming it and setting up some Query vars on the Request. This Function is based on Dot Net Core 2.2.0 API. This is how the VaultPath, SecretName, and SecretVersion values come into the function.
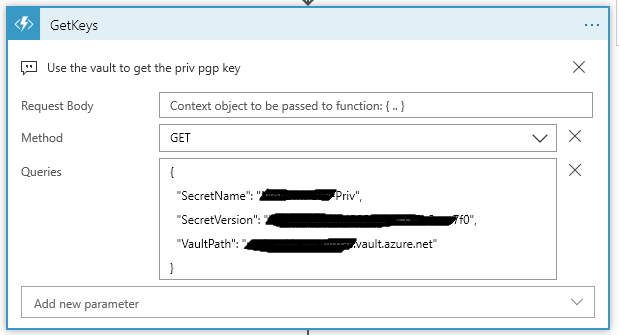
On the Logic App side, this the the Queries block:
{
  "SecretName": "<Get From the URL>",
  "SecretVersion": "<Get From the URL>",
  "VaultPath": "<Get From the URL>.vault.azure.net"
}
This next spot of code takes these values and forms our url that is need to speak to the Vault:
string secretKeyUrl = $"https://" + nameVault + $"/secrets/" + nameSecret + @"/" + versionSecret;
To access the vault we need to get a provider token and setup a vault client:
try
{
    var azureServiceTokenProvider = new AzureServiceTokenProvider();
    var kvClient = new KeyVaultClient(new KeyVaultClient.AuthenticationCallback(azureServiceTokenProvider.KeyVaultTokenCallback));
    var keyValue = await kvClient.GetSecretAsync(secretKeyUrl).ConfigureAwait(false);
The last statement here is where the async call is made into the value. Note my secret url is used here.
If everything is happy in vault land, keyValue here will contain the secret (middle part of the PGP key that we pasted into the vault value). So we are good, right? Well almost. Remember that part I was going on about in Part 1? The PGP Key format? We have to fix that up now before passing it back to the Logic App.
string privKey = "-----BEGIN PGP PRIVATE KEY BLOCK-----\n" + "Version: GnuPG v1.4.9 (MingW32)\n\n";

//must fix up the key to look like a real PGP key file
// So why?
//  The format of the key must be
//
// -----BEGIN PGP PRIVATE KEY BLOCK----- [CRLF]
// Version: GnuPG v1.4.9(MingW32)[CRLF]
// [CRLF]
//   <key detail> [CRLF]
//   <key detail2> [CRLF]
//   <key detail3> [CRLF]
// [CRLF]
// -----END PGP PRIVATE KEY BLOCK-----
//
//  The "vault" does not store the [CRLF] Gotta love that
//
//
privKey = privKey + keyValue.Value.Replace(" ", "\n") + "\n-----END PGP PRIVATE KEY BLOCK-----";
The comment section shows what we are trying to do here… take the value from the vault surround it with the PGP header/Trailer while putting back in the [CRLF]’s
Yes, I agree this is a colossal load of crap, but this is what we have.
The last part of the GetKeys function:
            return new OkObjectResult($"{privKey}");
        }
        catch (Exception ex)
        {
            log.LogInformation($"Error getting key from Vault: {keyUrl} Message: {ex.Message}");
            return (new BadRequestObjectResult($"GetKeys Error {ex.Message}"));

        }
    }
}
Returns back the Ok (200) with the response body containing the PGP key content.
In the end, it’s not too bad, and it does work…
In last part, we will finish up by decrypting some stuff…. See in Part 3 (or go back to Part 1).
~SG
-
The Azure Vault, PGP, and other matters Part 1
Let’s step back into cloud space for a moment. I had this challenge to see if I could do some decrypting of partner files. A simple matter, well yes and no (it does have some interesting parts to deal with).
First off, the files encrypted here are with PGP. Now this type of file protecting is not hard once you’ve gained an understanding of how to create and use keys. I’m not going to go into the deep end around PGP. There’s plenty of that for you to find on the internet. But I will need to mention a matter or two about how PGP key files are formatted and how they are used by some common PGP Nuget packages (more on that in a bit).
Back up in the cloud for a little while….
My design for getting encrypted partner files, decrypted them, and finally passing them along to downstream systems is simple for the most part. I use an Azure Logic App (a.k.a. a cloud work-flow) to handle the file movements and calling functions to decrypt (there are couple of Azure Functions to deal with the PGP Keys and Decrypting).
So the general over all design is something like this:
- Logic App triggered on a new file showing up on an sFTP site. The trigger runs on a timed interval.
- Next, the Logic App brings in the file content and removes the file from the sFTP site.
- We then get the decrypting key from a secrets store using an Azure Vault. This is done in a Azure Function.
- Once we have a key and file content, we call another Azure Function to decrypt the content.
- And finally, the decrypted content is pushed back out to a file.
Basic and mostly straight forward… Shall we begin….
Starting with our connector:
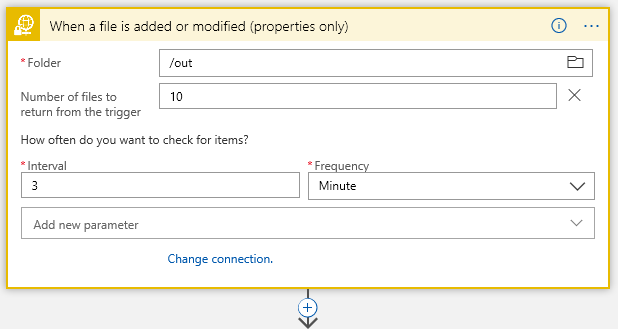
This is sFTP connector… I have /out folder where I start looking for files every 3 minutes..
Next Action filter on the filename with a Control:
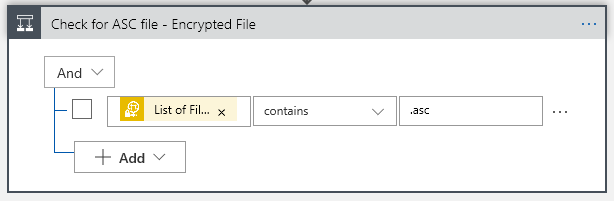
Now I know my files end in a .asc, so I will only grab those using the Control Conditional (yes, I probably should .Upper the filename to cover all bases, but one must leave room for improvements). That “List of Fil… btw is “List of Files Path” Dynamic content from the sFTP connector.
This gives us our True/False choices:

The “True” is where we want to go to do processing the file, of course. But what about the False side? We get here because, while we detected a file landing or changing on our sFTP folder, it did not meet our requirement that the filename contain a .asc. Big deal, right? Well, think about it. This may not be a problem, but if somewhere down the road one starts getting complaints about files not arriving… would it not be nice to have some historical trail when crap happened? At the end of the day the False side is optional, but why start out with throwing away events that may be important at some point?
This is where the cloud (Azure) makes life really easy… lets just push a false note to a Queue. Again, I’m not going to dive into creating a Storage account and creating a queue in that storage account – this is simple enough with a little reading and doing. But needless to say you will need a storage account and queue to do the following in the False:
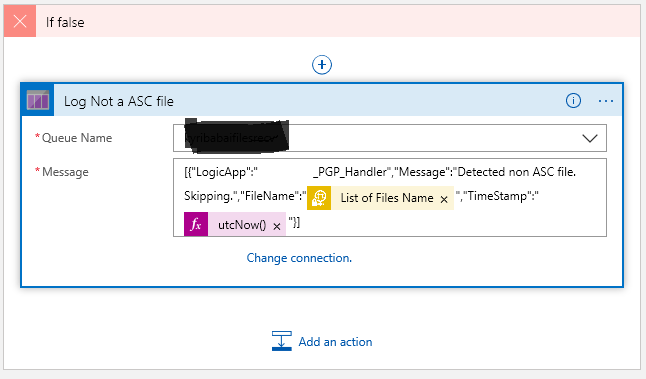
Once you create a connection to your storage account, the available queues within that storage will show up in the drop down. Now what you push into the queue is up to your choice. Here I’m putting my False note into some jason. I’ve also added a couple of Dynamic values… the “List Of Files Name” gives us the the filename from sFTP, and then we get the system timestamp.
Now the True side is good bit more interesting of course, because there’s something to do:
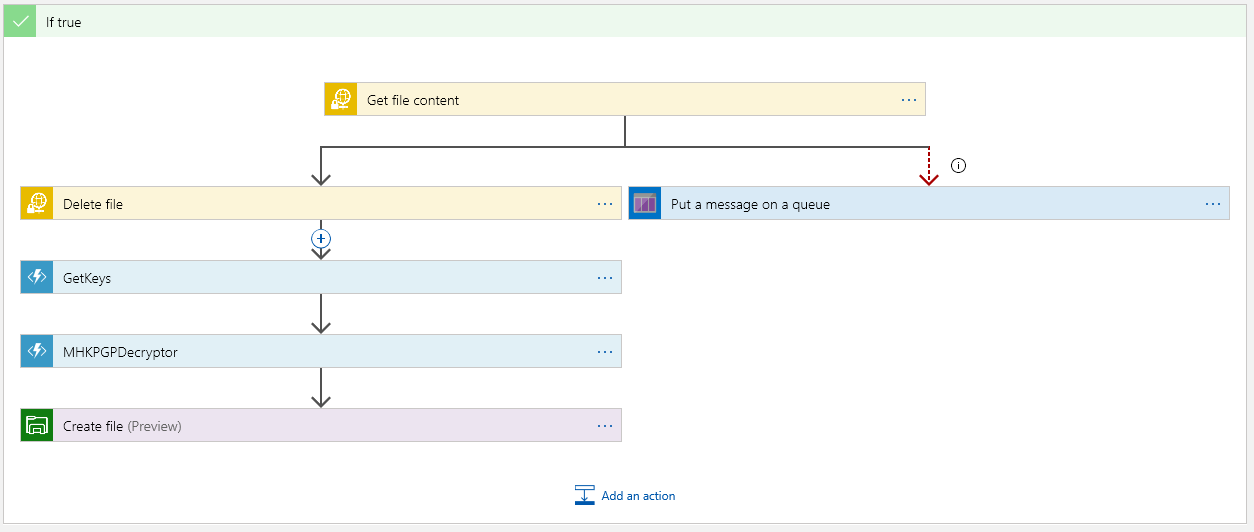
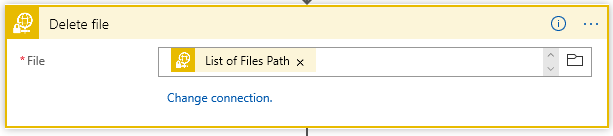
The top block is where we must get the file content. This is encrypted as this point. Once we have the content, we should delete the file on the sFTP server:
The “Put a message on the queue” side executes only if we cannot get the content. The “Run After” is set if Get Content “Has” anything except is successful so:
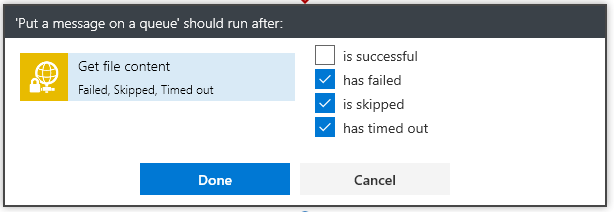
This way the App will not continue nor will it delete the file from the sFTP server.
Next we have the magic… Get the keys from Azure Vault:
Now setting up a secret in the vault comes down to several steps…. You must:
- Create a Key Vault
- Create a Secrets in the Vault using the PGP file as the Secret content.
- Provide access to the vault
The only step in building the vault that is tricky is knowing what to put in the secrets value to get PGP to work…
Consider the ascii format of a PGP key:
—–BEGIN PGP PRIVATE KEY BLOCK—– [CRLF]
Version: GnuPG v1.4.9(MingW32)[CRLF] – this line is optional
[CRLF]
<key detail> [CRLF]
<key detail2> [CRLF]
<key detail3> [CRLF]
[CRLF]
—–END PGP PRIVATE KEY BLOCK—-–Nope, I’m not making that up…. PGP, and more precisely the NuGet Packages for handling PGP are fussy about how the PGP key file is formatted. Trust me the PGP code will not be able to find the key if you don’t get the format correct. And there lies the problem with the Azure Vault.
It’s not really a problem… if you understand what is going on. If one uses the Web Portal to insert the secrets value, then understand that the [CRLF] are stripped from the cut/paste of the value. Yes, PGP does not like that. So what is the trick? The part of the key file to paste into the secret value is:
<key detail> [CRLF]
<key detail2> [CRLF]
<key detail3> [CRLF]The middle part of the key. One will find that the [CRLF] become a space (yes that is problem, but one that can be dealt with in the Azure Function :))
** I’m going to stop here for now… and make a Part 2 of this. We will pick up with the Azure Get keys function that deals with the PGP key from the secrets.
~SG.
-
Port Desk Top UI App
Not really ready for prime time , but here’s an article stepping through the how-to and the workaround for the fact that Core has yet to add the visual designer for, ya you guessed the actual Windows Form- that seems to be a rather glaring miss if we are talking about porting and doing traditional windows UI forms development going forward.
 In this post, I will describe how to port a desktop application from .NET Framework to .NET Core. I picked a WinForms application as an example. Steps for WPF application are similar and I?ll describe what needs to be done different for WPF as we go.
 -
Using Kestrel for ASP Core Apps
As I was looking about with some of the Core 2.2 notes, I came across some interesting notes on how to tweak about with Kestrel settings….
I’m not sure I like putting Kestrel options up the in the Main Program builder. I tend to prefer these to collect in the startup class, but I get point of why Kestrel needs to be handled close to the Builder (it is after all the html service handling web calls).
Shall we begin…
So up in program.cs we do our normal Web Host Builder:public class Program { public static void Main(string[] args) { var host = CreateWebHostBuilder(args).Build(); MigrateDatabase(host); host.Run(); //CreateWebHostBuilder(args).Build().Run(); } private static void MigrateDatabase(IWebHost host) { using (var scope = host.Services.CreateScope()) { var db = scope.ServiceProvider.GetRequiredService<ApplicationDbContext>(); db.Database.Migrate(); } } public static IWebHostBuilder CreateWebHostBuilder(string[] args) => WebHost.CreateDefaultBuilder(args) .UseStartup<Startup>(); }This tends to be my way of doing Program.cs. Note I split out the Build part into a static method (the normal default way is to have one fluent state that does a build and run in single line- it’s that commented line in the Main method)
public static IWebHostBuilder CreateWebHostBuilder(string[] args) =>
            WebHost.CreateDefaultBuilder(args)
                .UseStartup$lt;Startup>()
                .ConfigureKestrel(opts =>
                {
                    opts.Limits.MaxConcurrentConnections = 100;

                });
In my example, the method I push Kestrel setting to would of course have the .ConfigureKestrel with it’s options settings…
Check it out… lots of interesting tweaks on settings…
You will find some details here on MS DOCS:
 Learn about Kestrel, the cross-platform web server for ASP.NET Core.
 -
App Registration Link
This seems to want to move me off to Azure…
But for now the link still works…
https://apps.dev.microsoft.com
-
Play with dotnet tool and a BOT
I was poking about with cleaning up my DotNet Core sdks and in my travels a found this thing call dotnet tools… Let the experiment begin… To credit the source of an article on Microsoft go here: dotnet tool
Do a console project with dotnet:
dotnet new console -o botsay
Then, of course, cd into the botsay directory… and edit the Program.cs (yeap you can do this in VS 2017)
Here’s the main method:
using System.Reflection;static void Main(string[] args)
{
if (args.Length == 0)
{
var versionString = Assembly.GetEntryAssembly()
.GetCustomAttribute<AssemblyInformationalVersionAttribute>()
.InformationalVersion
.ToString();Console.WriteLine($"botsay v{versionString}");
Console.WriteLine("-------------");
Console.WriteLine("\nUsage:");
Console.WriteLine(" botsay <message>");
return;
}ShowBot(string.Join(' ', args));
}The ShowBot method is this:
static void ShowBot(string message)
{
    string bot = $"\n        {message}";
    bot += @"
    __________________
                      \
                       \
                          ....
                          ....'
                           ....
                        ..........
                    .............'..'..
                 ................'..'.....
               .......'..........'..'..'....
              ........'..........'..'..'.....
             .'....'..'..........'..'.......'.
             .'..................'...   ......
             .  ......'.........         .....
             .    _            __        ......
            ..    #            ##        ......
           ....       .                 .......
           ......  .......          ............
            ................  ......................
            ........................'................
           ......................'..'......    .......
        .........................'..'.....       .......
     ........    ..'.............'..'....      ..........
   ..'..'...      ...............'.......      ..........
  ...'......     ...... ..........  ......         .......
 ...........   .......              ........        ......
.......        '...'.'.              '.'.'.'         ....
.......       .....'..               ..'.....
   ..       ..........               ..'........
          ............               ..............
         .............               '..............
        ...........'..              .'.'............
       ...............              .'.'.............
      .............'..               ..'..'...........
      ...............                 .'..............
       .........                        ..............
        .....
";
    Console.WriteLine(bot);
}
It’s a simple core console app that takes a text phrase as input and shows the bot saying it.
Now the fun part… Of course, you should make sure that the code compiles.
Go back to your command window and do the folllowing:dotnet run dotnet run -- "Hello from the bot" dotnet run -- hello from the bot
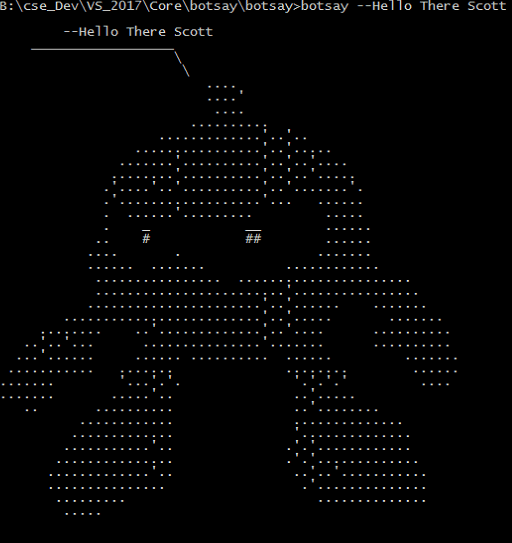
It’s a Bot!
Now… let’s make a dotnet tool…
Edit your botsay.csproj file. You can do this in VS 2017 or your favorite notepad…
You need to add these lines:
    <PackAsTool>true</PackAsTool>

    <ToolCommandName>botsay</ToolCommandName>

    <PackageOutputPath>./nupkg</PackageOutputPath>
In the end the csproj file show look like:
<Project Sdk="Microsoft.NET.Sdk">

  <PropertyGroup>
    <OutputType>Exe</OutputType>
    <TargetFramework>netcoreapp2.1</TargetFramework>

    <PackAsTool>true</PackAsTool>
    <ToolCommandName>botsay</ToolCommandName>
    <PackageOutputPath>./nupkg</PackageOutputPath>

  </PropertyGroup>

</Project>
Now the tool making part:
dotnet pack

dotnet tool install --global --add-source ./nupkg botsay

You can invoke the tool using the following command: botsay
Tool 'botsay' (version '1.0.0') was successfully installed.
Once you get the message back from the “dotnet tool”… command you now have a dotnet tool…
** You may have to close the command window and open a new one… depending on your OS, etc.You can type botsay –You’re Message Here…
Now, as you experiment don’t forget to clean up
dotnet tool uninstall -g botsay
You should read more about dotnet tool… start here: dotnet tool on Mircosoft docs
-
Getting Ready for Visual Studio 2019? We are at Preview 2
Looking at what is coming for Visual Studio 2019… It’s time to start looking and trying….
The official source of product insight from the Visual Studio Engineering Team -
Studio 2019 Preview 2 and Xamarin
Looking over the preview and I see some nice UI tweaks a coming. Check it out:
What’s New in Visual Studio 2019 Preview 2 for Xamarin
-
.Net Core 3 the next version
I still have not gone down the full .Net Core 3 path- but soon yes… Meanwhile MSDN mag has good preview on the topic:
-
Azure: Static Web Pages Article
I’m not really into “Static” web pages, but an interesting read popped up on the Azure Blog.
 Today we are excited to announce the general availability of static websites on Azure Storage, which is now available in all public cloud regions.