-
Dotnet 6 API with a HttpDelete and that 405 Method not allowed error
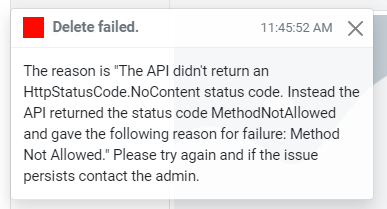
As we can tell from the title of the Post, we are going to talk about figuring out why in a client app one gets a Http Status code of 405 (Method Not Allowed).
When does this happen? Usually when a http request does a http PUT or DELETE. Yet, when one uses Swagger (openAPI) or Postman to directly call the same API Delete or Put, it works! This is starting to feel like a CORS issue, right? Read On ==>
So 405! Indeed looking at the surface of what is going on, one thinks Ah! CORS is at it again! Absolutely, this is what it feels like. After all, a Swagger/Postman GET/DELETE call under the same http domain works. But the moment one moves to a Client App coming in from a different domain (i.e. a different port on localhost, because different ports are also considered a different domain in terms of CORS), the Http PUT/DELETE stops working and throws a 405.
We are using VS2022 with Dotnet 6.0.100-rc.2.21505.57 (so the latest VS2022 and Dotnet RC 6 as of the writing of this post)
Wow… let’s step into how to rein in CORS…. We start in the API project in the Startup class.
In Configure Services =>
services.AddCors(options =>
{
    options.AddPolicy("CorsPolicy",
        builder => builder
        .AllowAnyOrigin()
        .AllowAnyHeader()
        .AllowAnyMethod()
        .WithMethods("GET","PUT","DELETE","POST","PATCH") //not really necessary when AllowAnyMethods is used.
        );
});
We build a CORS policy (yes one can remove the .WithMethods clause)
And of course we add in the Configure method =>
app.UseRouting();
app.UseCors("CorsPolicy");
And everything is right with the world… Let’s do a Delete in a client app. Meaning we are doing HttpClient Delete to a rest url that contains the id:

Yeap a hard 405… What the what What?
After digging through lots of readings on the topic of CORS 405 PUT/DELETE, DotNet 6 issues (with not much luck), I stepped upon the answer with a bit of thinking about the problem….In my Controller we have this as the delete method header =>
[HttpDelete("id")]
public async Task<IActionResult> Delete(int id)
{ ...
Seems simple enough, it works in the Swagger interface for testing the API. I validated that the client is using and passing the correct url and id. WHAT!?
Look closely at the [HttpDelete… tag. Notice anything? If one said, “Duh, ScottGeek- you need to wrap the “id” within {}” then YEAP!
That would be the issue. The real question is why does this seem work in the Swagger UI for the api but not in a app using HttpClient?I have absolutely no idea why (yes I could get Fiddler out and start digging deep, nope) In this case what seems like a CORS acting up issue (405 on a cross domain request), yeah it’s not, or is it? This seems to be a bug somewhere, I suspect, in the OpenAPI (swagger) bits. Why in the OpenAPI? because it should reflect the same 405 when the API Method tag is not 100% correct.
But let’s not just pick on OpenAPI. The fact that DotNet 6 allows both [HttpDelete(“id”)] and [HttpDelete(“{id}”)] without issuing some kind of build blowup or at least a green squiggle on the one that is in error… well I give it to ya… feels like a bug.
Put the {} around the id and….

Also, don’t forget to check one’s HttpPut as well…
~SG
-
The world of Dotnet Templates
I have long been using templates for dotnet new and of course Visual Studio. So I’ve started down the road of creating my own templates… or a least trying to understand how to create these,
Now creating templates for dotnet new and especially for Visual Studio has never been a simple task. But let us try.
The first matter is understanding where templates live. For the most part these are based on your user for your PC. This found by using a PS command:
join-path -Path $env:USERPROFILE -ChildPath .templateengine
This will return C:\Users\<your user name>\.templateengine And as you guess it, there is a .templateengine directory in your users directory. What does that mean, well simply put, when one does a .dotnet new –install, application templates get installed for your user. These actually live in that directory space. Simple enough.
When you start developing your own templates, you need to be careful, because the list of templates can get very long. That may or may not be a problem.
A handy PS script to clear out installed templates and put it back to the original set of templates:function Reset-Templates{ [cmdletbinding()] param( [string]$templateEngineUserDir = (join-path -Path $env:USERPROFILE -ChildPath .templateengine) ) process{ 'resetting dotnet new templates. folder: "{0}"' -f $templateEngineUserDir | Write-host get-childitem -path $templateEngineUserDir -directory | Select-Object -ExpandProperty FullName | remove-item -recurse &dotnet new --debug:reinit } }Keep in mind, this clears out all templates you have installed under your user. Use with care. If you have a set of favorite templates… yeap, they will get cleared off too!
Now, where to start? I would go to Sayed’s GitHub repo @
[visual-link-preview encoded=”eyJ0eXBlIjoiZXh0ZXJuYWwiLCJwb3N0IjowLCJwb3N0X2xhYmVsIjoiIiwidXJsIjoiaHR0cHM6Ly9naXRodWIuY29tL3NheWVkaWhhc2hpbWkvdGVtcGxhdGUtc2FtcGxlIiwiaW1hZ2VfaWQiOi0xLCJpbWFnZV91cmwiOiJodHRwczovL2F2YXRhcnMuZ2l0aHVidXNlcmNvbnRlbnQuY29tL3UvMTI4MzE1ND9zPTQwMCZ2PTQiLCJ0aXRsZSI6IlRlbXBsYXRlIFNhbXBsZSBieSBTYXllZCIsInN1bW1hcnkiOiJUaGlzIHJlcG8gY29udGFpbnMgYSBjb3VwbGUgc2FtcGxlcyBzaG93aW5nIGhvdyB5b3UgY2FuIGNyZWF0ZSBhIC5uZXQgY29yZSB0ZW1wbGF0ZSB0aGF0IGNhbiBiZSB1c2VkIGVpdGhlciBieSB0aGUgZG90bmV0IGNvbW1hbmQgbGluZSAoZG90bmV0IG5ldykgb3IgVmlzdWFsIFN0dWRpbyAmIFZpc3VhbCBTdHVkaW8gZm9yIE1hYy4iLCJ0ZW1wbGF0ZSI6InVzZV9kZWZhdWx0X2Zyb21fc2V0dGluZ3MifQ==”]
It’s a long read, but one can also go over to Channel9 and look for the video series that steps one through the process.
Another handy resource to search for templates is a web site:
[visual-link-preview encoded=”eyJ0eXBlIjoiZXh0ZXJuYWwiLCJwb3N0IjowLCJwb3N0X2xhYmVsIjoiIiwidXJsIjoiaHR0cHM6Ly9kb3RuZXRuZXcuYXp1cmV3ZWJzaXRlcy5uZXQvIiwiaW1hZ2VfaWQiOi0xLCJpbWFnZV91cmwiOiJodHRwczovL2F2YXRhcnMyLmdpdGh1YnVzZXJjb250ZW50LmNvbS91LzI2Nzg4NTgiLCJ0aXRsZSI6ImRvdG5ldCB0ZW1wbGF0ZXMiLCJzdW1tYXJ5IjoiU2l0ZSBmb3IgZmluZGluZyBkb3RuZXQgdGVtcGxhdGVzLiIsInRlbXBsYXRlIjoidXNlX2RlZmF1bHRfZnJvbV9zZXR0aW5ncyJ9″]
Enjoy
~ScottGeek -
Testing Block Editor
So here we go… how do we change the font… there does not seem to be a way to do that. 😎
#this is a example
docker --version
⇒More
-
C# Full Timestamp
Because I’m always having to look this up… a full (useful) timestamp should always look like this…
YYYYMMDD HH:MM:SS.fff => 20200730 14:58:00.000
string timeStamp = DateTime.Now.ToString("yyyyMMdd hh:mm:ss.fff tt");  //Example 20200730 03:02:39.591 PM
string fileTimeStamp = DateTime.Now.ToString("yyyyMMdd_HHmmssfff");    //20200730_150535040
string fileTimeStamp2 = DateTime.Now.ToString("yyyyMMdd_hhmmssffftt");// 20200730_030707929PM
~SG
-
Blazor: And the Identity Scaffolding Mess
Ok, back around to the annoying bin. Let’s talk adding Identity to a Blazor Web Assembly app…
Out of the box when you start with a Blazor WebAss project using Identity and of course ASP Core hosted (I’m using preview 2). You then decide that all of the hidden razor pages really need to be customized (don’t even get me started on Hidden razor pages). Well there is a way to do just that.
You Add Scaffolded Item to the Server project and select Identity (nope not going to show you that- there’s plenty of how-to on the internet). I wait while you go figure out how-to do that…… Wait wait wait wait….
All right, now you have those missing identity pages up in Areas/Identity/Pages/Account – and you have an app that compiles and run, right? Well…. NO you don’t. Because now your app is broken… And that’s where we start… Let’s fix it.
The Fix –
RegisterConfirmation.chtml.cs (if during your scaffold you selected the RegisterConfirmation page to include in the Areas/Identity/Pages/Account)
You will need to add the reference using Microsoft.AspNetCore.Identity; – this is missing from the code behind.The Scaffold also creates an another wwwroot folder in the .Server project – The app runs into conflicts with css etc…
All you need to do here is delete the wwwroot folder from the .Server project. The Blazor will come up normal.Now, there maybe other compile errors depending on the mix of .dot core you have, etc. You will just need to work through those.
Another annoying thing that happens when you mix Blazor and these older razor identity pages… is how the identity system works when you logout. Normally one likes to have the app navigate back to the home page when one logs out. This is doable but not in the box on the template.
This is easy fix….
In your client project in the Pages folder, you have a Authentication.razor file:
@page "/authentication/{action}"
@using Microsoft.AspNetCore.Components.WebAssembly.Authentication
<RemoteAuthenticatorView Action="@Action" />

@code{
    [Parameter] public string Action { get; set; }
}
This is the default page… Let’s make a change…
@page "/authentication/{action}"
@using Microsoft.AspNetCore.Components.WebAssembly.Authentication
@inject NavigationManager navMGR
<RemoteAuthenticatorView Action="@Action">
    <LogOutSucceeded>
      @{navMGR.NavigateTo("/");}
    </LogOutSucceeded>
</RemoteAuthenticatorView>

@code{
    [Parameter] public string Action { get; set; }
}
We injected the NavigationManager, because we want to navigate to the home page.
One see that in the RemoteAuthenticationView we have some options… LogOutSucceeded is a component option that allows us to do something, when the user has logged out with no errors.
This is good place to put a NavigateTo Blazor command… and as we see we can force the app (from the box) to go to the home page.Neat…
Now yes, the errors and problems are annoying… they have been for the scaffold for awhile now… but hopefully as Blazor moves out of preview, these things will be fixed.
~ScottGeek Happy Blazoring….
-
Play with dotnet tool and a BOT
I was poking about with cleaning up my DotNet Core sdks and in my travels a found this thing call dotnet tools… Let the experiment begin… To credit the source of an article on Microsoft go here: dotnet tool
Do a console project with dotnet:
dotnet new console -o botsay
Then, of course, cd into the botsay directory… and edit the Program.cs (yeap you can do this in VS 2017)
Here’s the main method:
using System.Reflection;static void Main(string[] args)
{
if (args.Length == 0)
{
var versionString = Assembly.GetEntryAssembly()
.GetCustomAttribute<AssemblyInformationalVersionAttribute>()
.InformationalVersion
.ToString();Console.WriteLine($"botsay v{versionString}");
Console.WriteLine("-------------");
Console.WriteLine("\nUsage:");
Console.WriteLine(" botsay <message>");
return;
}ShowBot(string.Join(' ', args));
}The ShowBot method is this:
static void ShowBot(string message)
{
    string bot = $"\n        {message}";
    bot += @"
    __________________
                      \
                       \
                          ....
                          ....'
                           ....
                        ..........
                    .............'..'..
                 ................'..'.....
               .......'..........'..'..'....
              ........'..........'..'..'.....
             .'....'..'..........'..'.......'.
             .'..................'...   ......
             .  ......'.........         .....
             .    _            __        ......
            ..    #            ##        ......
           ....       .                 .......
           ......  .......          ............
            ................  ......................
            ........................'................
           ......................'..'......    .......
        .........................'..'.....       .......
     ........    ..'.............'..'....      ..........
   ..'..'...      ...............'.......      ..........
  ...'......     ...... ..........  ......         .......
 ...........   .......              ........        ......
.......        '...'.'.              '.'.'.'         ....
.......       .....'..               ..'.....
   ..       ..........               ..'........
          ............               ..............
         .............               '..............
        ...........'..              .'.'............
       ...............              .'.'.............
      .............'..               ..'..'...........
      ...............                 .'..............
       .........                        ..............
        .....
";
    Console.WriteLine(bot);
}
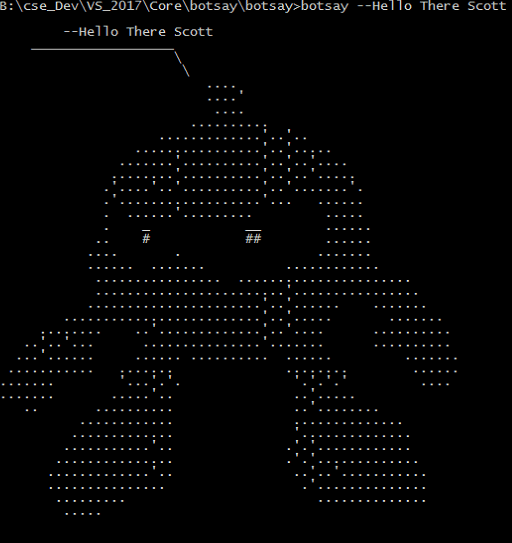
It’s a simple core console app that takes a text phrase as input and shows the bot saying it.
Now the fun part… Of course, you should make sure that the code compiles.
Go back to your command window and do the folllowing:dotnet run dotnet run -- "Hello from the bot" dotnet run -- hello from the bot

It’s a Bot!
Now… let’s make a dotnet tool…
Edit your botsay.csproj file. You can do this in VS 2017 or your favorite notepad…
You need to add these lines:
    <PackAsTool>true</PackAsTool>

    <ToolCommandName>botsay</ToolCommandName>

    <PackageOutputPath>./nupkg</PackageOutputPath>
In the end the csproj file show look like:
<Project Sdk="Microsoft.NET.Sdk">

  <PropertyGroup>
    <OutputType>Exe</OutputType>
    <TargetFramework>netcoreapp2.1</TargetFramework>

    <PackAsTool>true</PackAsTool>
    <ToolCommandName>botsay</ToolCommandName>
    <PackageOutputPath>./nupkg</PackageOutputPath>

  </PropertyGroup>

</Project>
Now the tool making part:
dotnet pack

dotnet tool install --global --add-source ./nupkg botsay

You can invoke the tool using the following command: botsay
Tool 'botsay' (version '1.0.0') was successfully installed.
Once you get the message back from the “dotnet tool”… command you now have a dotnet tool…
** You may have to close the command window and open a new one… depending on your OS, etc.You can type botsay –You’re Message Here…
Now, as you experiment don’t forget to clean up
dotnet tool uninstall -g botsay
You should read more about dotnet tool… start here: dotnet tool on Mircosoft docs
- Hello 👋, how can I help you today?
