SQL Server
Everything SQL
-
SQLlocalDB – and How to add a latest version of a LocalDB instance
For those that develop with a backend DB, localdb has always been a good ‘go to’ option. A Dev db hosted on a localDB instance provides a good base that is simple to move to Production. It also has a benefit of Migrations. (Yes, SQL Server is not the only DB engine to provide such, but we will talk about SQL Server here).
LocalDB is a handy, for free, SQL instance that basically comes with VS installations (yes, now a days you do have to pick the correct workload).
With that in mind, those of us that long ago installed the venerable LocalDB, we were often suck with older versions of the SQL instance.Well, not so much anymore does one have to work with a LocalDB based on 2012 (Yeah, one has been using Visual Studio for awhile).
So what is the secret? Use the command line utility SQLlocalDB to create a new “more recent version” LocalDB instance. Yes, one can remove the older instances as well. Just remember, if you have databases that are still in use with other development, make sure you re-create those DB’s etc on your new instance. Now onto the secret sauce…SQLlocalDB Utility The Microsoft page that gives full details on this SQL utility.
From your favorite command line do a SQLlocalDB c <name of your instance>
At this one will get a 15.0.4153.1 version of a SQL instance. Also, make note of SQLlocalDB i and SQLlocalDB s <instance name> and SQLlocalDB p <instance name>
~SG
-
BCP and Clustered SQL Oh the Errors
I got a curious message concerning problems that someone from work was having issues getting a relatively simple BCP (Bulk Copy for SQL) to work.
So here we go:
bcp "select top 5 [Data] from [ADataBase].[dbo].[ATable]  where [ProcessedTime] <= GetDate()-1 and MessageType=''SomeProduct'' order by [ProcessedTime] desc for xml raw, root(''MyexportRoot'')"' +
    ' QUERYOUT ""B:\BCPBatch\Data\sample.xml"" -T -c  -S TheSQL\Instance';
It’s a little complicated… Basically pull data from a table in DB on a SQL Instance… and output as xml to an xml file.
After spending, a few hours, getting all kinds of errors about drive not found, path not found, can’t open the file… bah bah bah. It’s like what the hell?!You take that statement and execute it on a console window or powershell window… and no problems, but you get into SSMS, and in a query window… and nothing but errors… So something like this:
EXECUTE sp_configure 'show advanced options', 1;
GO
-- To update the currently configured value for advanced options.
RECONFIGURE;
GO
-- To enable the feature.
EXECUTE sp_configure 'xp_cmdshell', 1;
GO
-- To update the currently configured value for this feature.
RECONFIGURE;
GO

  declare @cmd nvarchar(512);
-- Please note that the fully qualified table name is needed
select @cmd = 'bcp "select top 5 [Data] from [ADataBase].[dbo].[ATable] where [ProcessedTime] <= GetDate()-1 and MessageType=''SomeProduct'' order by [ProcessedTime] desc for xml raw, root(''MyexportRoot'')"' + ' QUERYOUT ""B:\BCPBatch\Data\sample.xml"" -T -c -S TheSQL\Instance';
exec xp_cmdshell @cmd;
go

EXECUTE sp_configure 'xp_cmdshell', 0;
GO
-- To update the currently configured value for this feature.
RECONFIGURE;
GO

EXECUTE sp_configure 'show advanced options', 0;
GO
And let the errors happen… and they do. What’s the issue here… well nothing really with the code, but with the fact that my TheSql\Instance was in fact Clustered!
So why is that a problem? It’s this part here:
QUERYOUT “”B:\BCPBatch\Data\sample.xml”” – the syntax is correct, but on a clustered server file locations are problematic! Meaning, the cluster does not normally have full access to all of the drives. Now, will a network share work? Not sure. I didn’t test that.
The solution I suggested was to move to another SQL instance that was not clustered, and the script worked.
~SG -
A slight issue when one wants to install SQL 2019 Dev, etc The ODBC 17 SQL Driver
On my way to getting the latest SQL Server installed on one of my Dev PC’s- I ran across the issue of getting prompt for:
msoledbsql.msi
What the hell…
ODBC Driver 17 is what that is about. Apparently, the SQL installed is not smart enough to know that one already has ODBC 17 SQL Driver installed and runs into a major “cannot resolve” the problem. The end result is that one does not get the SQL instance installed…
But after reading lots of “not really helping” blurbs from the Internet, the Solution is simple… well mostly.
You have to uninstall the “Microsoft ODBC Driver 17 for SQL Server” – one can find it on windows 10 in the APPS & Features. Uninstall it and redo the SQL install. One should have better luck with moving forward with getting SQL installed…
~ScottGeek
-
Powershell Create of the SSISDB Catalog
So when management gets this [insert explicative] idea to strip away my MSDN enterprise access, and I need to create an SSISDB catalog on my dev server- what the hell am I to do? Well, maybe not simple… I put on my PowerShell hack through hat. Shall we?
In your favorite SQL instance (we’ll just use localhost for my examples) start with making sure you have CLR ENABLED first:
EXEC sp_configure 'clr enabled', 1;
RECONFIGURE;
GO
Do this in a query window in SSMS of course.
Now the PowerShell:
# Load the IntegrationServices Assembly
[Reflection.Assembly]::LoadWithPartialName("Microsoft.SqlServer.Management.IntegrationServices")

# Store the IntegrationServices Assembly namespace to avoid typing it every time
$ISNamespace = "Microsoft.SqlServer.Management.IntegrationServices"

Write-Host "Connecting to server ..."

# Create a connection to the server
$sqlConnectionString = "Data Source=localhost;Initial Catalog=master;Integrated Security=SSPI;"
$sqlConnection = New-Object System.Data.SqlClient.SqlConnection $sqlConnectionString

# Create the Integration Services object
$integrationServices = New-Object $ISNamespace".IntegrationServices" $sqlConnection

# Provision a new SSIS Catalog
$catalog = New-Object $ISNamespace".Catalog" ($integrationServices, "SSISDB", "P@assword1")
$catalog.Create()
The last part in “Provision a new SSIS Catalog” make sure you do a good password.
And that’s it…. So why am I doing this with PowerShell? No “DIS” on PowerShell, but it seems that the version I install SQL Server 2016 has this thing about connecting to Azure SSIS with creating a SSISDB Catalog, and since I no longer have access to MSDN (you knew MSDN was in this somewhere) I had to hack my way around getting a catalog created… Now yes, I could have done the Azure SQL SSISDB connect bah bah (I do have an enterprise Azure accounts), but you what? This same management does not want to spend money on Azure… YA! An Azure SQL SSISDB has a cost.
So there you go… Got to love this jumping around not having the tools to get stuff done.
~ScottGeek
-
The SQL Server Windows credentialing to work with ASP.Core and other IIS Web Sites
So somewhere in the backwaters of connecting an IIS hosted web app (a.k.a ASP Core 2.x SPA like app that uses SQL Server as it’s data host), we find the secret not so secret way to wire up a Windows Credential for Database access.
Write this down:
IIS AppPool\DefaultAppPool or Generically IIS AppPool\<Name My Pool>
We start here in IIS with our favorite App Pool-

Now this one is just for example… an ASP Core app pool, of course, would have a No Managed Code like this:

Either way, the SQL Windows credential set up is the same….
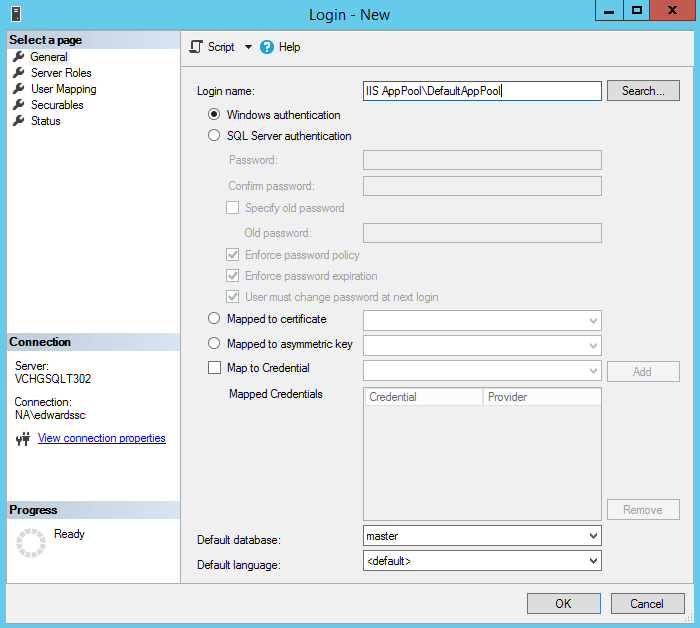
In SQL server the new login looks like this: Note the IIS AppPool\My Favorite App Pool
If the database already exists, you can select the default database at this time…
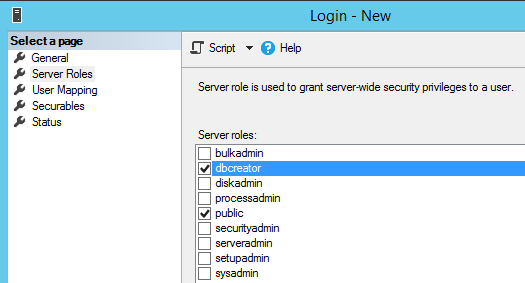
Now a word about SQL Roles:

Before creating the new SQL Login – one should add at least add the dbcreator role for this login. It will be important if you plan to use EF Core Migrations, and of course if you want to have the new web site automatically create and seed a new db instance as well as perform and EF Core Migration. Don’t skip this step if you intend to do continuous deployment.
Now the last bit is the connection wire up in your Web App:
In your appsettings.json file, normally you set a default connection string… it should look something like this:
“DefaultConnection”: “Server=<Your Server SQL Instance>;Database=<My AppDatabase>;Trusted_Connection=True;MultipleActiveResultSets=true”
Now this connection string does vary but basically– Server= Database= and Trusted_Connection=True are the important parts… the other parameters are optional.
Now, notice no “User Id=” or “Password=” are in the string. Well, that is the point. You certainly can set up a SQL user and password for your database. But the whole point of setting the app pool windows credential in SQL was to avoid putting passwords in a appsettings file.
One last matter- and it can drive you crazy. When you publish your web site (or app) to IIS, make sure your actual App pool is assigned correctly. I know it’s like a “DUH” moment here. But your App Pool/SQL Credential/Web Connection string need to be aligned. Or guess what? Indeed, connecting errors will be in your path… or way depending on how you look at it.
Now back to Web App’ing
~SG