-
EF Migration tasks in the Program.cs – The good and the Ugly
Program.cs of any core project (especially ASP.Net Core) is our first starting point to get some necessary work out of the wrong. In this case EF DB Migrations. You know that EF thing where you keep your attached DB tables in sync with your data models? (or in some cases… mess up your existing database).
Life in program.cs normally starts here:
public class Program
{
    public static void Main(string[] args)
    {
        CreateWebHostBuilder(args).Build().Run();
    }

    public static IWebHostBuilder CreateWebHostBuilder(string[] args) =>
        WebHost.CreateDefaultBuilder(args)
            .UseStartup<Startup>();
}
But let’s consider this:
public class Program
{
    public static async Task Main(string[] args)
    {
        IWebHost webHost = CreateWebHostBuilder(args).Build();

        // Create a new scope
        using (var scope = webHost.Services.CreateScope())
        {
            // Get the DbContext instance
            var myDbContext = scope.ServiceProvider.GetRequiredService<MyDbContext>();

            //Do the migration asynchronously
            await myDbContext.Database.MigrateAsync();
        }

        // Run the WebHost, and start accepting requests
        // There's an async overload, so we may as well use it
        await webHost.RunAsync();
    }

    public static IWebHostBuilder CreateWebHostBuilder(string[] args) =>
        WebHost.CreateDefaultBuilder(args)
            .UseStartup<Startup>();
}
What the? So what is going on here… Well, basically we are injecting our EF DB Migration process between the creating of our web app (Build) and the actual Running of the site… You know that period of time when processes are defined and setup and actually begin listening on the wire.
Have a look at this article….
https://andrewlock.net/running-async-tasks-on-app-startup-in-asp-net-core-part-1/
-
The SQL Server Windows credentialing to work with ASP.Core and other IIS Web Sites
So somewhere in the backwaters of connecting an IIS hosted web app (a.k.a ASP Core 2.x SPA like app that uses SQL Server as it’s data host), we find the secret not so secret way to wire up a Windows Credential for Database access.
Write this down:
IIS AppPool\DefaultAppPool or Generically IIS AppPool\<Name My Pool>
We start here in IIS with our favorite App Pool-

Now this one is just for example… an ASP Core app pool, of course, would have a No Managed Code like this:

Either way, the SQL Windows credential set up is the same….
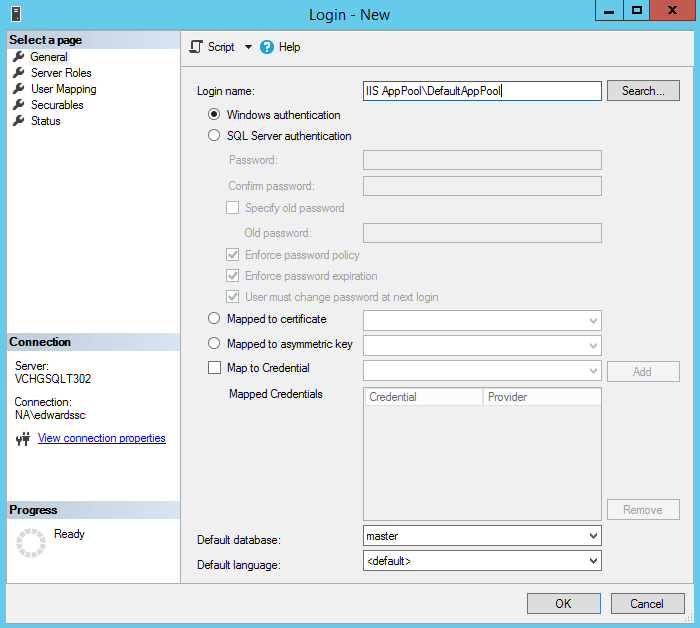
In SQL server the new login looks like this: Note the IIS AppPool\My Favorite App Pool
If the database already exists, you can select the default database at this time…
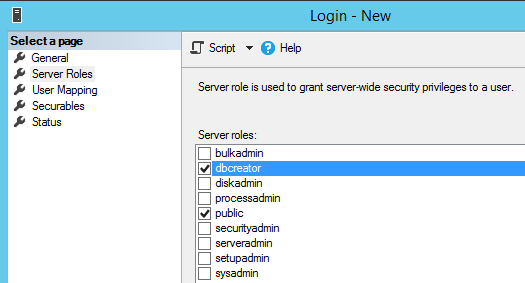
Now a word about SQL Roles:

Before creating the new SQL Login – one should add at least add the dbcreator role for this login. It will be important if you plan to use EF Core Migrations, and of course if you want to have the new web site automatically create and seed a new db instance as well as perform and EF Core Migration. Don’t skip this step if you intend to do continuous deployment.
Now the last bit is the connection wire up in your Web App:
In your appsettings.json file, normally you set a default connection string… it should look something like this:
“DefaultConnection”: “Server=<Your Server SQL Instance>;Database=<My AppDatabase>;Trusted_Connection=True;MultipleActiveResultSets=true”
Now this connection string does vary but basically– Server= Database= and Trusted_Connection=True are the important parts… the other parameters are optional.
Now, notice no “User Id=” or “Password=” are in the string. Well, that is the point. You certainly can set up a SQL user and password for your database. But the whole point of setting the app pool windows credential in SQL was to avoid putting passwords in a appsettings file.
One last matter- and it can drive you crazy. When you publish your web site (or app) to IIS, make sure your actual App pool is assigned correctly. I know it’s like a “DUH” moment here. But your App Pool/SQL Credential/Web Connection string need to be aligned. Or guess what? Indeed, connecting errors will be in your path… or way depending on how you look at it.
Now back to Web App’ing
~SG
-
App Registration Link
This seems to want to move me off to Azure…
But for now the link still works…
https://apps.dev.microsoft.com
-
Play with dotnet tool and a BOT
I was poking about with cleaning up my DotNet Core sdks and in my travels a found this thing call dotnet tools… Let the experiment begin… To credit the source of an article on Microsoft go here: dotnet tool
Do a console project with dotnet:
dotnet new console -o botsay
Then, of course, cd into the botsay directory… and edit the Program.cs (yeap you can do this in VS 2017)
Here’s the main method:
using System.Reflection;static void Main(string[] args)
{
if (args.Length == 0)
{
var versionString = Assembly.GetEntryAssembly()
.GetCustomAttribute<AssemblyInformationalVersionAttribute>()
.InformationalVersion
.ToString();Console.WriteLine($"botsay v{versionString}");
Console.WriteLine("-------------");
Console.WriteLine("\nUsage:");
Console.WriteLine(" botsay <message>");
return;
}ShowBot(string.Join(' ', args));
}The ShowBot method is this:
static void ShowBot(string message)
{
    string bot = $"\n        {message}";
    bot += @"
    __________________
                      \
                       \
                          ....
                          ....'
                           ....
                        ..........
                    .............'..'..
                 ................'..'.....
               .......'..........'..'..'....
              ........'..........'..'..'.....
             .'....'..'..........'..'.......'.
             .'..................'...   ......
             .  ......'.........         .....
             .    _            __        ......
            ..    #            ##        ......
           ....       .                 .......
           ......  .......          ............
            ................  ......................
            ........................'................
           ......................'..'......    .......
        .........................'..'.....       .......
     ........    ..'.............'..'....      ..........
   ..'..'...      ...............'.......      ..........
  ...'......     ...... ..........  ......         .......
 ...........   .......              ........        ......
.......        '...'.'.              '.'.'.'         ....
.......       .....'..               ..'.....
   ..       ..........               ..'........
          ............               ..............
         .............               '..............
        ...........'..              .'.'............
       ...............              .'.'.............
      .............'..               ..'..'...........
      ...............                 .'..............
       .........                        ..............
        .....
";
    Console.WriteLine(bot);
}
It’s a simple core console app that takes a text phrase as input and shows the bot saying it.
Now the fun part… Of course, you should make sure that the code compiles.
Go back to your command window and do the folllowing:dotnet run dotnet run -- "Hello from the bot" dotnet run -- hello from the bot

It’s a Bot!
Now… let’s make a dotnet tool…
Edit your botsay.csproj file. You can do this in VS 2017 or your favorite notepad…
You need to add these lines:
    <PackAsTool>true</PackAsTool>

    <ToolCommandName>botsay</ToolCommandName>

    <PackageOutputPath>./nupkg</PackageOutputPath>
In the end the csproj file show look like:
<Project Sdk="Microsoft.NET.Sdk">

  <PropertyGroup>
    <OutputType>Exe</OutputType>
    <TargetFramework>netcoreapp2.1</TargetFramework>

    <PackAsTool>true</PackAsTool>
    <ToolCommandName>botsay</ToolCommandName>
    <PackageOutputPath>./nupkg</PackageOutputPath>

  </PropertyGroup>

</Project>
Now the tool making part:
dotnet pack

dotnet tool install --global --add-source ./nupkg botsay

You can invoke the tool using the following command: botsay
Tool 'botsay' (version '1.0.0') was successfully installed.
Once you get the message back from the “dotnet tool”… command you now have a dotnet tool…
** You may have to close the command window and open a new one… depending on your OS, etc.You can type botsay –You’re Message Here…
Now, as you experiment don’t forget to clean up
dotnet tool uninstall -g botsay
You should read more about dotnet tool… start here: dotnet tool on Mircosoft docs
-
Getting Ready for Visual Studio 2019? We are at Preview 2
Looking at what is coming for Visual Studio 2019… It’s time to start looking and trying….
The official source of product insight from the Visual Studio Engineering Team -
Studio 2019 Preview 2 and Xamarin
Looking over the preview and I see some nice UI tweaks a coming. Check it out:
What’s New in Visual Studio 2019 Preview 2 for Xamarin
-
.Net Core 3 the next version
I still have not gone down the full .Net Core 3 path- but soon yes… Meanwhile MSDN mag has good preview on the topic:
-
Azure: Static Web Pages Article
I’m not really into “Static” web pages, but an interesting read popped up on the Azure Blog.
Today we are excited to announce the general availability of static websites on Azure Storage, which is now available in all public cloud regions. -
Azure Deep Dive Class Completed.
Finished up a week of deep dive into Azure Logic Apps, Service Bus, and Integration accounts.
I need to write up some conversations…. and of course, some setup walk-throughs.
-
EF Core adds DB Seeding back with some gotchas
Looking back down the latest with EF core (in my case 2.1.4), I notice some gotchas when it comes to Data Seeding….
So basically when you involve your migrations with using .HasData it’s understood that you must provide a initial value for all columns that are keys.
**Side note: this comes from the EF Core team that they want to maintain consistency across multiple migrations. Well, I can understand their reasoning, but I think it’s unnecessary, because we are talking about in most cases initial testing data. I get it.With this requirement in mind, this brings up some problems with seeding. In particular with data classes that have constructors and entities with private setters. Consider the example (taken from a PluralSight course on this very topic):
public class Location
{
    public int LocationId { get; private set; }
    public string StreetAddress { get; set; }
    public string OpenTime { get; set; }
    public string CloseTime { get; set; }
    public List<Unit> BrewingUnits { get; set; }
    public Location(string streetAddress, string openTime, string closeTime)
    {
        StreetAddress = streetAddress;
        OpenTime = openTime;
        CloseTime = closeTime;
    }
}
For locationId we have a private setter, because this will be handled on the DB as Id type key. Well when it comes to doing a DataSeed:
modelBuilder.Entity<Location>().HasData(
 new Location
  {
        LocationId = 1,
        StreetAddress = "1 Main Street",
        OpenTime = "6AM",
       CloseTime = "4PM"
    });
This code is going to have a problem, because for New Location, the private setter will throw a compiler error, yeap. But EF Core HasData must be able to set ALL key values. Yeah, how to paint oneself into a corner.
Well, anonymous types to the rescue!
modelBuilder.Entity<Location>().HasData(
 new {
      LocationId = 1,
      StreetAddress = "1 Main Street",
      OpenTime = "6AM",
      CloseTime = "4PM"
     });
It becomes anonymous because Location type is removed from the new statement- the Location type is already known because of .Entity of Location type- so EF Core already knows how to build the migration.
If we look at the actual migration code:
migrationBuilder.InsertData(
 table: "Locations",
  columns: new[] { "LocationId", "CloseTime", "OpenTime", "StreetAddress" },
           values: new object[] { 1, "4PM", "6AM", "1 Main Street" });
We see the key is getting set- that will make EF Core happy.
Is this a good or bad way to deal with this? It depends on your take on anonymous types. It does feel a little kluge like. But again, this comes from how the EF Core team decided to handle HasData seeding when it comes to keys. Btw, foreign keys are not excluded from this requirement.
